Bird's Nest Fern Care: How to Grow and Maintain a Thriving Asplenium Nidus
Published on
April 21, 2025
Author
Zuri Khumalo
Zuri's frequent journeys to South Africa in her youth ignited her fervor for environmental science, gardening, and sustainable living. These travels deepened her connection with nature, inspiring her to contribute to conservation efforts in her own meaningful ways.
Ornamental Plants Q&A
Can I grow ornamental plants with names I do not know in pots?
Yes! Almost any plant can thrive in a container as long as the pot is the right size and has drainage holes at the bottom. From indoor houseplants to outdoor shrubs like boxwoods, the key is simply matching the container to the plant's root size and ensuring excess water can escape.
What is the difference between an annual and a perennial plant?
This is a great question for any new gardener. An annual plant, like a Marigold or a Zinnia, lives its whole life in just one year. You plant the seed in the spring, it grows flowers all summer, and when the winter cold comes, it dies completely, meaning you have to plant new ones next year. A perennial plant, like a Hosta or a Lavender, will go to sleep during the winter but its roots stay alive, and it will push out new green leaves and flowers every single spring for many years.
Are beautiful ornamental plants hard to take care of?
Not at all. The secret to low-maintenance gardening is "right plant, right place." A shade-loving plant put in a dark corner will thrive with almost no effort, whereas a sun-loving plant in that same spot will constantly struggle. Once you match a plant to your yard's specific sunlight and soil moisture, many stunning ornamentals will practically take care of themselves.
Growing Bell Peppers Q&A
Are peppers easy to grow for beginners?
Yes, sweet bell peppers are generally easy to grow as long as you wait until the weather is thoroughly warm before planting them outside. Providing consistent water and full sun does most of the heavy lifting.
Do I need to wear gloves when handling sweet bell peppers?
No. While handling hot peppers requires care (and often gloves) to avoid burning your skin or eyes with capsaicin, sweet bell peppers have zero heat and are perfectly safe to handle bare-handed.
Can I grow a bell pepper from a scrap from my kitchen?
While you can technically harvest seeds from a store-bought pepper scrap, it is not recommended. Grocery store peppers are often hybrids, meaning their seeds will not grow true to the parent plant, and they may be treated to prevent germination. It is always better to buy dedicated pepper seed.
Garden Styles Q&A
How do I find my garden style?
To find your garden style, gather garden design ideas that match your personal taste and outdoor space. Whether you work alone or hire a landscape architect or garden designer for your project, find the perfect fit by looking at various styles. You might prefer the clean lines of a modern garden or the meandering paths of a Japanese garden style.
What is the best design style for a small garden or apartment?
For an apartment, small garden, or urban garden, container gardening is your best friend. A courtyard or city garden setup looks great with the sleek lines and hardscape of contemporary gardens. You can also create a mini Mediterranean garden with fragrant herbs like rosemary in pots, or a compact tropical gardens layout with bold tropical plants.
How do I choose the right plants for my landscape?
Choosing the right plants makes your garden complete. For a low-maintenance landscape, rely on native plants and drought-tolerant plants. Always match the planting to your design style: use Japanese maples and bonsai trees for a Japanese garden, a neat shrub or hedge for a formal garden style, and wildflowers or grass for a naturalistic space.
If you're looking for a stunning, low-maintenance houseplant with lush, tropical foliage, the Bird’s Nest Fern is an excellent choice. Known for its wavy, bright green fronds that resemble a bird’s nest at the center, this fern adds an elegant touch to any indoor or outdoor space. Unlike many ferns, it thrives in warm, humid conditions and doesn’t require constant fussing—making it perfect for beginners and seasoned plant enthusiasts alike.
In this guide, we’ll walk you through everything you need to know about Bird’s Nest Fern care, from the ideal growing conditions and watering techniques to maintenance tips that keep your fern healthy and vibrant. Whether you're growing it as a houseplant or incorporating it into a tropical garden, this guide will help you cultivate a lush, thriving Asplenium nidus with ease.
Name: Bird’s Nest Fern (Asplenium nidus)
Plant Type: Epiphytic fern
Size: 2–4 feet tall and wide
Soil Type: Well-draining, rich in organic matter
Soil pH: Slightly acidic to neutral (5.5–6.5)
Bloom Time: Does not produce flowers; reproduces via spores
Hardiness Zones: USDA zones 10–12
Native Area: Tropical regions of Asia, Australia, and Africa
Toxicity Level: Non-toxic to pets and humans
Best Bird’s Nest Fern Types
While Asplenium nidus is the most well-known variety, several cultivars and species offer unique leaf shapes, sizes, and textures, making them excellent choices for indoor and outdoor greenery.
Asplenium nidus ‘Crispy Wave’
This variety stands out with its deeply ruffled, wavy fronds that create a striking, rippling effect. The fronds are more rigid and upright compared to standard A. nidus, allowing them to capture more light, making this plant particularly efficient at air purification. It thrives in humid environments and is a popular choice for modern indoor décor.
Sometimes mistaken for A. nidus, this species has noticeably narrower, glossier fronds with a more defined midrib. Native to Japan and Taiwan, it has a more structured, compact growth habit, making it ideal for smaller spaces. It is slightly more tolerant of drier conditions than A. nidus, though it still prefers humidity.
A smaller and more compact cultivar, ‘Osaka’ is known for its highly pronounced, wavy frond edges, giving it a unique, decorative appearance. Its leaves are thick and slightly more structured, making it a hardy choice for indoor environments. Due to its smaller size, it works well in terrariums and tight spaces.
Asplenium nidus ‘Victoria’
This variety is one of the most distinctive, featuring fronds with beautifully curled, ruffled tips. The edges have a crimped or scalloped look, adding extra texture and visual interest. ‘Victoria’ is highly sought after as an ornamental plant due to its more dramatic foliage. It thrives in consistently moist soil and high humidity, making it a perfect fit for bathrooms and tropical-themed gardens.
How to Plant Bird’s Nest Fern
Planting from Seed (Spore Propagation)
Collect spores from mature fronds (look for brownish dots on the underside).
Prepare a shallow tray with a moist, well-draining medium like sphagnum moss or peat-based potting mix.
Sprinkle spores on the surface, covering them lightly with plastic wrap to maintain humidity.
Place in a warm, humid environment (70–80°F) with indirect light.
Keep the soil moist, and germination should occur in a few weeks to months.
Once seedlings develop small fronds, transfer to individual pots.
Planting from Seedlings or Potted Plants
Choose a pot with drainage holes that is slightly larger than the root ball.
Fill with well-draining potting mix (peat moss, orchid bark, and perlite).
Gently remove the plant from its container and loosen the roots if they are compacted.
Place the fern in the pot, ensuring the center (rosette) is above the soil.
Fill around the plant with soil and press lightly to secure it.
Water gently and place in bright, indirect light.
Bird’s Nest Fern Care Requirements
Soil
Bird’s Nest Fern thrives in moist, well-draining soil that closely replicates its natural epiphytic environment. Since this fern typically grows on tree trunks or rocks in the wild, it requires a loose and airy growing medium that allows roots to breathe while retaining enough moisture to prevent dehydration. A well-balanced mix of peat moss, perlite, and orchid bark provides the ideal conditions, ensuring proper aeration and drainage. Peat moss helps maintain moisture levels, perlite enhances drainage, and orchid bark supports root health by preventing compaction. Avoid using heavy or clay-based soils, as they tend to retain excessive water, which can lead to root rot and suffocate the plant.
Water
Keeping the Bird’s Nest Fern’s soil evenly moist is essential for its overall health, but it is equally important to avoid overwatering, which can lead to root rot and fungal diseases. Water the plant when the top inch of soil feels dry, using room-temperature water to prevent shocking the roots. When watering, aim for the soil at the base rather than the center of the rosette, as stagnant water in the plant’s crown can cause rot and fungal infections. This fern’s watering needs change with the seasons—during warmer months, it may require more frequent watering, while in winter, when its growth slows, reduce watering to prevent excessive moisture accumulation. Using a well-draining pot with drainage holes further helps prevent overwatering issues.
Temperature & Humidity
As a tropical plant, the Bird’s Nest Fern thrives in warm, humid environments. It prefers temperatures between 65–80°F (18–27°C) and struggles in conditions below 50°F (10°C), which can lead to leaf damage and slowed growth. Protect it from sudden temperature fluctuations by keeping it away from cold drafts, air conditioners, and heating vents. Humidity is equally crucial, as dry air can cause the fronds to develop brown, crispy edges. Ideally, humidity levels should be kept between 60–80%. If the indoor air is dry, using a humidifier, placing a tray of water and pebbles near the plant, or misting the fronds regularly can help maintain the necessary moisture. Grouping it with other humidity-loving plants can also create a more suitable microclimate.
Sunlight & Location
Proper lighting is key to ensuring a Bird’s Nest Fern grows vibrant and healthy. Indoors, place it in bright, indirect light, such as near an east- or north-facing window where it will receive soft morning sunlight or diffused light throughout the day. Direct sunlight, especially from a south- or west-facing window, can scorch its delicate fronds, leading to browning and damage. If necessary, use sheer curtains to filter intense light. Outdoors, it should be placed in a shaded or semi-shaded area, such as under a tree or on a covered patio, where it receives dappled sunlight. This fern can also adapt to lower light conditions, making it an excellent choice for bathrooms or offices with artificial lighting, as long as humidity levels are maintained.
Maintenance Tips for Healthy Ferns
Fertilizing
Ferns require a steady supply of nutrients during their active growing seasons to maintain lush, green foliage. Use a balanced liquid fertilizer diluted to half strength once a month during spring and summer. This prevents overfeeding, which can lead to excessive salt buildup in the soil, potentially damaging the delicate roots. Organic fertilizers such as fish emulsion or compost tea can also be beneficial for a more natural approach. However, it’s crucial to stop fertilizing during the fall and winter months when the plant enters dormancy. During this time, the fern slows its growth, and excess nutrients may accumulate in the soil, leading to weak or leggy growth in the next season.
Pruning
Pruning is essential for maintaining the health and appearance of your fern. Regularly inspect the plant for yellowing, browning, or damaged fronds and trim them off using clean, sharp scissors or pruning shears. Removing dead or dying fronds not only enhances the plant’s aesthetic appeal but also allows it to focus energy on producing new, healthy foliage. When pruning, avoid cutting the central rosette, which is the heart of the plant where new fronds emerge. Damaging this area can stunt growth and weaken the plant. For best results, prune lightly throughout the growing season and remove only the affected fronds instead of cutting back large sections at once.
Mulching
For outdoor ferns, applying a layer of mulch around the base of the plant helps retain soil moisture, regulate temperature, and suppress weed growth. Organic mulches such as sphagnum moss, shredded bark, or leaf mold work best as they decompose over time, enriching the soil with nutrients. A layer about 1–2 inches thick is ideal—too much mulch can suffocate the roots and promote fungal diseases. Be sure to keep mulch slightly away from the base of the plant to prevent moisture buildup, which could lead to root rot or pest infestations. Mulching is especially beneficial in hot, dry climates where moisture retention is crucial for the plant’s survival.
Potting & Repotting
Ferns are relatively slow-growing, but they will eventually outgrow their containers and require repotting every 2–3 years. Signs that your fern needs repotting include roots emerging from the drainage holes, slowed growth, or the plant becoming root-bound. When repotting, choose a container that is only 1–2 inches larger in diameter than the current pot. A pot that is too large can retain excess moisture, increasing the risk of root rot. Use a fresh, well-draining potting mix rich in organic matter, such as a blend of peat moss, perlite, and compost. Carefully remove the fern from its old pot, gently loosen the roots, and place it in the new container at the same depth it was previously planted. Water thoroughly after repotting to help the roots settle into their new environment.
Overwintering
If your fern is grown outdoors in a cooler climate, it will need protection when temperatures drop below 50°F (10°C). Before the first frost, bring potted ferns indoors and place them in a location with bright, indirect light and consistent humidity. Reduce watering during the winter months, as the plant's growth slows, but do not let the soil dry out completely. Since indoor heating can dry out the air, maintain adequate humidity by misting the fern regularly, using a humidity tray, or placing it near a humidifier. If the fern is too large to bring indoors, consider applying a thick layer of mulch around the base and covering it with burlap to provide insulation. Overwintering properly ensures the fern will remain healthy and resume vigorous growth in the spring.
Common Pests and Diseases Affecting Ferns
Pests
Aphids: Aphids are small, sap-sucking insects that cluster on fern fronds, causing leaves to yellow and curl. To get rid of them, wipe the leaves with a mild soap solution or spray with neem oil, which acts as a natural insecticide.
Scale insects: Scale insects are another common pest that attach themselves to fern stems and leaves, appearing as small, immobile bumps while feeding on plant sap. These pests can be removed manually using a cotton swab dipped in rubbing alcohol or controlled with neem oil to prevent further infestation.
Mealybugs: Mealybugs are easy to identify due to their white, cotton-like appearance on leaves and stems. These pests drain nutrients from the plant, leading to weak and discolored foliage. To eliminate mealybugs, use a mild soap solution or neem oil and regularly check the plant to prevent re-infestation.
Diseases
Root rot: Root rot is a serious issue caused by overwatering and poor drainage, leading to fungal growth and mushy, blackened roots. To prevent root rot, use well-draining soil and allow the top inch of soil to dry before watering. If root rot has already developed, trim the affected roots and repot the fern in fresh, dry potting mix.
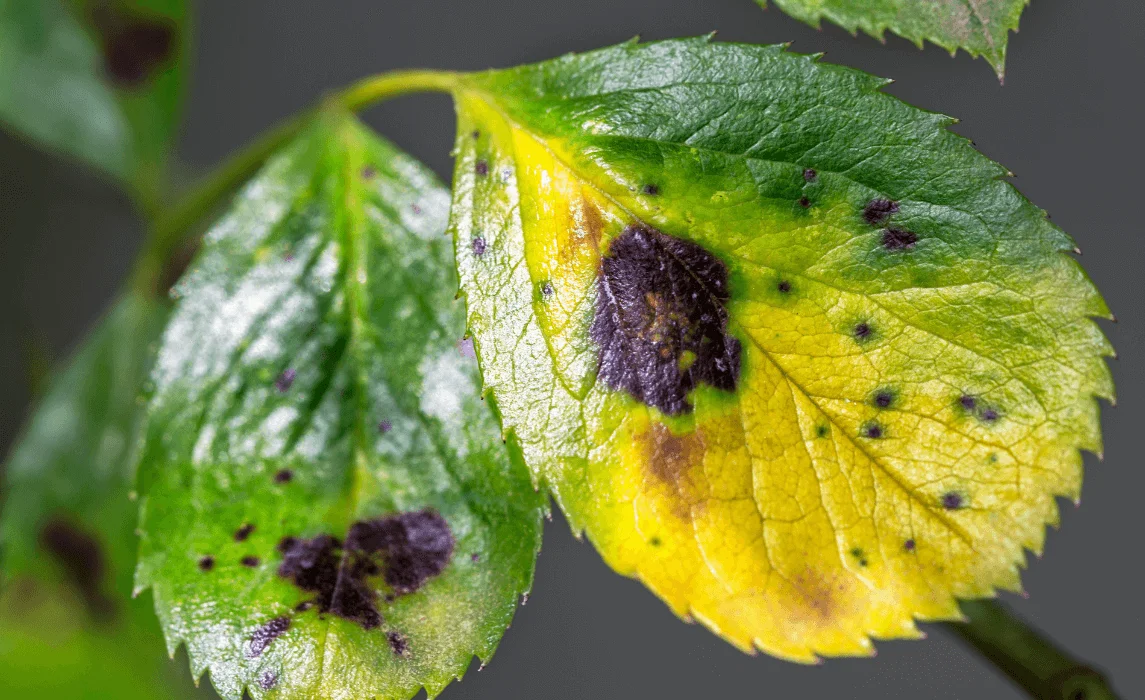
Leaf spot: Leaf spot is a fungal infection that occurs due to excessive moisture on the leaves. It causes brown or black spots to appear on the fronds, which can spread if left untreated. To manage leaf spot, improve air circulation around the plant, avoid misting directly onto the leaves, and apply a fungicide if necessary.
Brown, crispy edges: Brown, crispy edges on fern fronds are often a sign of low humidity or underwatering. When the air is too dry, the edges of the leaves begin to brown and become brittle. To maintain proper humidity levels, consider using a humidifier, misting the plant lightly, or placing it near other plants to create a more humid environment.
Frequently Asked Questions:
Q: Can I Grow a Bird’s Nest Fern Indoors?
A: Yes! Bird’s Nest Ferns are excellent houseplants and are commonly grown indoors. They thrive in warm, humid environments like bathrooms or kitchens.
Q: Can I Grow a Bird’s Nest Fern with Other Fern Varieties?
A: Yes! Bird’s nest ferns grow well with other fern varieties, such as staghorn ferns. Just ensure all plants have similar plant care needs, including humidity and indirect light.
Q: Should I Mist My Bird’s Nest Fern?
A: Misting can provide temporary moisture, but it’s better to run a humidifier or use a humidity tray. Misting too often can encourage fungal diseases.
Related posts
Here are some articles you might be interested in.


