Benefits of Composting: Environmental and Gardening Gains
Published on
April 2, 2025
Author
Zuri Khumalo
Zuri's frequent journeys to South Africa in her youth ignited her fervor for environmental science, gardening, and sustainable living. These travels deepened her connection with nature, inspiring her to contribute to conservation efforts in her own meaningful ways.
English Garden Q&A
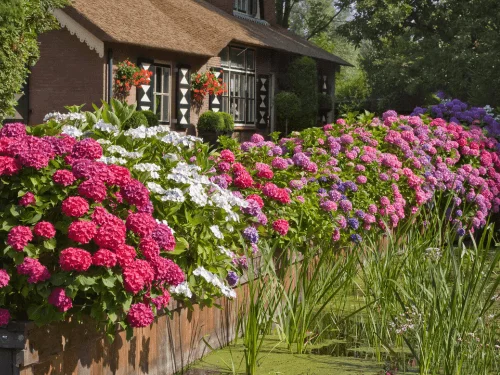
How can I implement English garden ideas if I only have a very small space or a compact front garden?
Focus heavily on vertical layering using climbing roses or honeysuckle, and use a soft pastel color palette to add an illusion of depth. Gathering multi-sized planters along walkways also provides an overflowing, lush look within a restricted footprint.
What are the best strategies to ensure my English border retains visual interest during the winter months?
Incorporate structural evergreens like boxwood hedges, pruned topiary, or permanent hardscape anchors like a stone sundial. Avoid clear-cutting in autumn; leaving dried seed heads and tall foxglove stalks intact through winter captures striking structural shapes and textures.
Can I achieve an authentic cottage style look if my yard does not receive direct sun all day?
Yes. While roses need direct sun, classic woodland edge plants like the foxglove thrive beautifully in partial shade and dappled light. Pair these with shade-tolerant foliage and soft ground cover to capture a romantic, layered look.
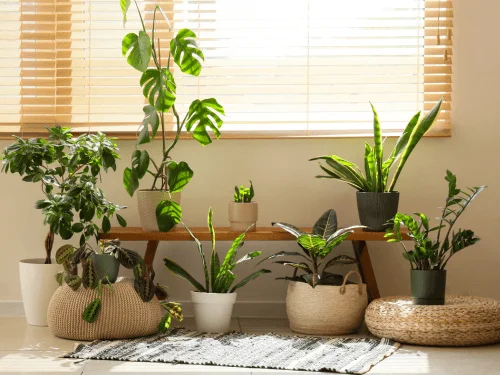
Easy Houseplants Q&A
Why is there a white, crusty buildup on the surface of my plant's soil?
This is a very common issue for indoor house plants. Usually, it is a buildup of soluble salts and minerals from tap water or fertilizer. If it looks soft and fuzzy rather than hard and crystalline, it might be a harmless saprophytic fungus breaking down organic matter in the soil. To fix mineral crusts, scrape off the top layer of soil and occasionally "flush" the pot by pouring distilled water through it until it runs out the bottom freely.
Do easy houseplants need fertilizer to survive?
They will survive without it, but they won't thrive. In nature, plants get a constant supply of nutrients. In a pot, they eventually deplete the soil. Using a standard houseplant fertilizer at half-strength during the spring and summer will encourage stronger roots and larger leaves. Do not fertilize in winter when the plants are dormant.
How do I know if my plant is getting the right amount of light?
If a plant is getting too much direct light, its leaves will look bleached, washed out, or develop crispy, scorched brown patches. If it isn't getting enough light, the growth will be "leggy" (long stems with large gaps between leaves), variegated plants will lose their patterns and turn solid green, and the soil will take weeks to dry out, increasing the risk of root rot.
Rooftop Garden Design And Roof Garden Ideas For Your Terrace
What is the most important step before transforming your rooftop into a garden?
The most critical step is hiring a structural engineer to assess the load-bearing capacity of your roof surface. Soil, water, and containers are incredibly heavy, and ignoring weight restrictions can lead to catastrophic structural damage. Additionally, you must verify all local laws to ensure compliance.
How do I manage regular watering during hot weather and dry spells?
Because the sun and wind dry out elevated pots rapidly, hand-watering becomes exhausting. The best solution is to install a drip irrigation system with automated irrigation lines to ensure consistent moisture. Using a self-watering pot or adding vermiculite and coir to your soil mix will also help retain water during a dry spell.
What kind of soil mix should I use for growing plants in containers on a roof terrace?
Never use standard garden dirt, as it is too heavy and compacts easily. Instead, use a lightweight potting soil that includes a balanced mix of loam for structure, coir for moisture retention, and vermiculite for aeration. Enrich this base with organic compost and worm castings to provide nutrients.
This disclosure clearly states that the content creator may earn a commission if readers make a purchase through the provided links. Learn more
If you're an avid gardener, you’ve probably heard about composting. It’s one of those terms that gets tossed around in green circles, but what exactly is composting? More importantly, why should you do it for your garden? Let’s break it down in a way that feels approachable and easy to follow.
The Basics of Composting
At its core, composting is the process of recycling organic matter, like food scraps and garden waste, into a rich, nutrient-filled material known as compost. Think of compost as nature’s way of recycling waste into gold for your garden soil. When organic materials break down, they create a substance that’s fantastic for enriching soil. It improves soil texture, boosts its water retention, and provides essential nutrients that your plants crave.
Why should you compost for gardening?
By composting, you're essentially giving your garden a natural, sustainable fertilizer that helps plants grow stronger and healthier. It's like giving your soil a daily vitamin boost. Plus, it's a great way to reduce food waste while creating something useful in return.
What Is Compost Best Used For?
Compost is particularly beneficial for improving the overall health of your soil. Whether your garden beds need a nutrient boost or you're trying to loosen heavy clay soil, compost can work wonders. It’s most commonly used as:
Soil conditioner: It enriches the soil, making it better at holding nutrients and water, which is crucial for plant growth.
Mulch: Spread around your plants, it helps retain moisture and suppress weeds.
Fertilizer: Compost slowly releases nutrients over time, making it an ideal organic fertilizer for plants.
The Benefits of Composting
1. Nutrient boost
Compost is packed with organic nutrients like nitrogen, potassium, and phosphorus—essential elements that help plants grow. Unlike synthetic fertilizers, which can give your plants a fast food-style jolt, compost offers a slow and steady release of nutrients. This means your plants get a consistent flow of nutrition over time, which helps them grow healthier and stronger. Plus, because it’s all-natural, your plants will love the organic feast!
2. Soil improvement
Adding compost to soil improves its structure, creating a perfect balance of moisture retention and drainage—no more soggy mess, no more bone-dry patches! Whether you're dealing with sandy soil that drains too fast or dense clay that feels like a brick, compost is a game-changer. It improves soil structure, making it lighter, fluffier, and just right for plant roots to wiggle through and spread out. Healthy roots mean happy plants.
3. Reducing waste
Give your food scraps a second life. Instead of sending those veggie peels and coffee grounds off to a landfill where they’d sit for ages, breaking down and releasing harmful methane gas (not great for the planet), you’re turning them into rich, garden-friendly compost. It's an eco-friendly way to reduce waste while creating something your plants will love. Less waste in landfills and fewer greenhouse gases—it’s a win-win for you and the environment.
4. Reducing the need for chemical fertilizers
Tired of relying on chemical fertilizers that can be harsh on your garden (and your wallet)? Composting is the natural alternative that gives your garden a nutrient-rich boost without the risk of toxic buildup. Chemical fertilizers can sometimes leach harmful substances into the soil and water supply, but with compost, you're nourishing your plants the good old-fashioned way—naturally! Less reliance on chemicals also means you’re helping create a more sustainable ecosystem in your garden.
What Are the Environmental Benefits of Composting?
Composting isn’t just good for your garden; it’s great for the planet too. Here are some of the environmental benefits of composting:
Cuts down on landfill waste: Organic materials, like food scraps and plant matter, make up a large portion of waste sent to landfills. By composting, you reduce the volume of waste heading to landfills, which in turn reduces methane (a potent greenhouse gas) emission from decomposing waste.
Minimizes the use of pesticides and fertilizers: Compost adds nutrients and improves soil health naturally, reducing the need for synthetic pesticides and fertilizers, which can have harmful environmental effects.
Plants That Benefit Most from Composting
So, what kinds of plants will give you a big thumbs-up for adding compost to their soil? Honestly, almost all of them! But some really thrive with that extra nutrient boost from compost. Here’s a breakdown of a few garden stars that will absolutely love your homemade compost:
1. Vegetables like tomatoes, peppers, and leafy greens
If you’re growing veggies, compost is your secret weapon. Tomatoes and peppers are heavy feeders—they suck up nutrients like nobody’s business, and compost helps replenish the soil with everything they need to keep producing big, juicy fruits. Leafy greens, like spinach and lettuce, love compost because it keeps the soil rich in nitrogen, which helps them grow those big, tender leaves. Trust me, your veggie garden will thank you with bumper crops!
2. Flowering plants such as roses, daisies, and zinnias
Roses are the divas of the garden, always demanding the best treatment. And that’s where compost comes in! It keeps the soil rich and well-drained, which roses absolutely adore. Daisies and zinnias, on the other hand, might seem more low-maintenance, but they too benefit from compost. The steady release of nutrients helps them bloom longer and brighter, making your garden pop with color all season long. Plus, it improves the soil’s moisture balance, so these flowers stay happy even in dry spells.
If you want an abundant fruit harvest, compost is a must! Fruit trees are in it for the long haul, and they need a constant supply of nutrients to keep producing sweet, delicious fruit year after year. It gives them that steady flow of goodness, and it also helps improve soil texture, so the tree’s roots can grow deep and strong. Whether it's apples, pears, or peaches, your fruit trees will reward your compost efforts with bigger, juicier, and more flavorful fruits.
4. Herbs such as basil, parsley, and mint
Herbs may seem small and easy-going, but they thrive when the soil is enriched with compost. Basil loves nitrogen-rich soil, which compost delivers in a natural, slow-release way, keeping those leaves lush and full of flavor. Parsley and mint also benefit from it by growing strong and spreading out nicely. Compost helps herbs get the right balance of nutrients without overwhelming them, making your herb garden vibrant and aromatic!
Now, let’s get into the nitty-gritty of how to actually compost at home. Follow these simple steps to create a compost pile that will provide nutrient-rich organic material for your garden.
Step 1: Choose a Composting Method
There are several ways to compost depending on your space and needs:
Compost bin: Ideal for small spaces or urban gardens. It keeps everything contained and easy to manage.
Compost pile: A traditional method for those with more space. You simply pile your compostable materials in a designated area.
Tumbler: A rotating compost bin that speeds up the composting process by improving aeration.
Tip: If you're just starting, a compost bin might be easiest to manage and less intimidating.
Step 2: Gather Compostable Organic Materials
To build a successful compost, you need a good mix of green and brown materials:
Green materials: These are high in nitrogen and include items like vegetable scraps, fruit peels, coffee grounds, and fresh grass clippings.
Brown materials: These are carbon-rich and include items like dried leaves, cardboard, straw, and newspaper.
The ideal ratio is roughly 3 parts brown to 1 part green. The browns help balance the moisture and prevent odors, while the greens provide nitrogen to help break things down.
Tip: Avoid composting meats, dairy products, or oils, as they can attract pests and slow down the composting process.
Step 3: Build Your Compost Pile
Once you’ve gathered your materials, it’s time to start layering. Begin with a layer of coarse brown materials, such as straw or small twigs, to help with airflow. Then alternate between layers of green and brown materials.
Tip: Chop or shred larger items, like branches or tough vegetable stems, to help them break down faster.
Step 4: Maintain the Pile
Your compost pile needs a little TLC to keep breaking down efficiently:
Turn the pile: Every few weeks, turn your compost to introduce oxygen. This helps speed up the decomposition process and prevents your compost from becoming too compact.
Check moisture levels: The compost should feel like a wrung-out sponge—damp, but not soaking wet. If it’s too dry, add more green materials or water. If it’s too wet, mix in more browns.
Tip: In hot, dry climates, cover your compost pile with a tarp to prevent it from drying out too quickly.
Step 5: Harvest Your Compost
In about 3-6 months (depending on your composting method and climate), your compost should be ready to use. It will look like dark, crumbly soil and have an earthy smell. Spread a layer of this finished compost around your plants, mix it into garden beds, or use it as a potting mix ingredient.
Q: What is the difference between backyard composting and using composting facilities?
A: Backyard composting is a DIY approach where you manage compost in your own yard using kitchen scraps, yard waste, and other organic materials. It’s a great way to create healthy soil and reduce waste at home. Composting facilities, on the other hand, are larger, industrial operations where organic waste from cities or businesses is processed on a bigger scale. These facilities handle tons of waste from the broader waste stream, making a significant impact on environmental protection by diverting large amounts of material from landfills and reducing greenhouse gases that contribute to climate change. While both options are beneficial, backyard composting gives you the satisfaction of seeing your waste turn into rich compost right in your garden, whereas composting facilities take on a larger, community-wide role.
Q: How does composting help prevent soil erosion?
A: Composting plays a crucial role in reducing erosion by improving soil structure. When you add compost to your garden, it acts as a natural soil amendment, increasing the soil’s ability to hold moisture and bind together. Healthy soil created from compost is more resilient and better able to withstand the effects of wind and water, which are major causes of erosion. This is especially important in areas prone to heavy rains or droughts. Plus, by enriching your garden with compost, you’re contributing to environmental protection—less eroded soil means less sediment runoff into water systems, keeping ecosystems healthier.
Q: How does composting benefit the environment in the fight against climate change?
A: Composting is a simple yet powerful way to combat climate change. When organic materials decompose in landfills, they release methane, a potent greenhouse gas. By composting, either in your backyard or through composting facilities, you’re keeping food scraps and yard waste out of landfills and diverting them into a process that creates nutrient-rich compost instead. This not only helps reduce methane emissions but also produces healthy soil that can improve plant growth and reduce the need for synthetic fertilizers. Compost acts as a natural soil amendment, locking carbon into the ground and helping with long-term environmental protection. So, by composting, you're contributing to a healthier planet!
Related posts
Here are some articles you might be interested in.